I'm glad you got this issue resolved
Do visit our HP Support Community and drop us a message anytime you need help
Thank you 😊
I'm glad you got this issue resolved
Do visit our HP Support Community and drop us a message anytime you need help
Thank you 😊
It's great that you found a solution on the HP forums page, you can also try the below steps :
If printed text is too small or the entire page prints in a smaller size than expected, change the font size or page scale settings in the application you are printing from.
In Adobe PDF reader: In the Print window, click Size in the Paper Size & Handling section, then select Actual Size or choose a larger size in the Custom Scale box.
In Word document: Change font size settings when printing from WordPad or Microsoft Word. For page size scaling, use settings in the Print Preview window or in Resizing Options in the print driver.
Open the document, then highlight the text that you want to change. To select all the text in the document, press the Ctrl + Akeys.
Click the Increase Font Size or Grow font button to make the fonts larger.
Figure : Example of the font type, font size, and increase font size menus in Windows document applications
Confirm paragraph, image, and page break layout in your document accommodate the larger text.
Let me know if this works.
Please click “Accepted Solution” if you feel my post solved your issue, it will help others find the solution. Click the “Kudos/Thumbs Up" on the bottom right to say “Thanks” for helping!
New 7740 that prints ok from word/ excel etc. When printing from the web, including some pdfs, graphics are ok but the text comes out garbled. the actual individual letters are printed as boxes with a barely legible alpha numeric code (presuambly the font ref?) such as
EO
54
Anyone experienced this before? I would love to hear any ideas. Thanks
HP DeskJet 2630 All-in-One Printer is designed in such a way that it does have a Bottom border of 12.7 mm if you are using a US letter A4 size sheet to print/copy
To check the specifications of this printer clickhere
You can adjust the margin settings by following the below steps:
Load the custom-size paper into the paper input tray.
Open the item you want to print.
Click File, and then select Print.
In Paper Size, select Manage Custom Sizes.
The Custom Paper Sizes window displays.
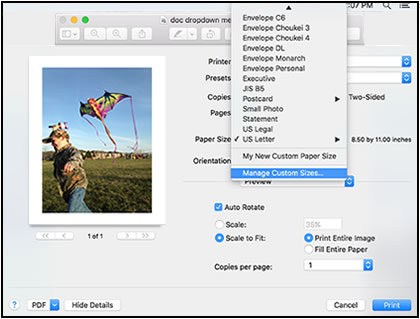
In the Custom Paper Sizes window, click the plus sign  to create a new paper size, double-click the default untitled name, and then type a new name for the custom paper size.

In the Paper Size section, type the dimensions of the custom paper in the Width and Height text boxes, and then set the margins, if desired.
Paper Size
Margins
Click OK.
In the print preview window, select the new custom paper size.
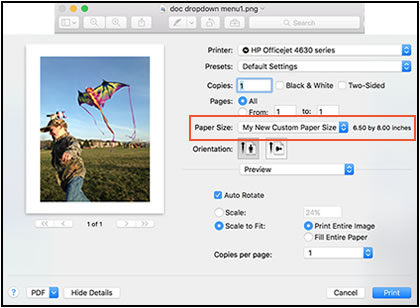
Change print settings, if desired, and then click OK or Print to print the document.
Let me know if this works.
Please click “Accepted Solution” if you feel my post solved your issue, it will help others find the solution. Click the “Kudos/Thumbs Up" on the bottom right to say “Thanks” for helping!
Welcome to HP Support Community,
We are going to provide you some additional steps via PM that are specific related to your product model.
Check next to your profile Name, you should see a little blue envelope, please click on it. Click here for more details on how to access the private messages on HP Support Community.
Please click “Accept as Solution” if you feel my post solved your issue, it will help others find the solution.
Click the “Kudos, Thumbs Up" on the bottom right to say “Thanks” for helping!
Welcome to the HP Support Community.
If you insert your old color ink cartridge, do you still get an error message?
Let's try to reset the Printer here:
Turn the printer on, if it is not already on.
Also, try connecting the Printer to a different wall outlet directly.
If the information I've provided was helpful, give us some reinforcement by clicking the Accepted Solution and Kudos buttons, that'll help us and others see that we've got the answers!
Thanks!
Have a great day!
Welcome to the HP Support Community!
I recommend you follow the steps in the below article and check if it helps.
Let me know how it goes and you have a great day!
If you wish to show appreciation for my efforts, mark my post asAccept as Solution.Your feedback counts!
Cheers!
Thank you very much. I have made a note of your suggestions shoule I have other issues. Again - THANKS
Welcome to the HP Support Community.
Does this happen while copying too?
To achieve the best print quality, it is necessary to align the ink cartridges.
After installing new ink cartridges, the printer automatically prints an alignment page.
Lift the scanner lid.
Place the alignment page with the print side down on the scanner glass, and then position it according to the engraved guides around the glass.
Figure : Placing the alignment page on the scanner glass
Close the scanner lid.
Press the Start Copy Black button  or the Start Copy Color button
  on the printer control panel.
The printer aligns the ink cartridges.
Print a Print Quality Diagnostic page in Windows:
Use HP Printer Assistant to print a Print Quality Diagnostic page in Windows.
Load plain paper into the input tray.
Search Windows for your printer model name, and then click the printer name in the list of results.
HP Printer Assistant opens.
Click Print & Scan, and then click Maintain Your Printer.
The printer toolbox opens.
On the Device Services tab, click Print Quality Diagnostics Page .
.
A Print Quality Diagnostic page prints.
Let me know how this report looks.
If the issue persists, please perform the remaining steps from this document: https://support.hp.com/us-en/product/hp-deskjet-2600-all-in-one-printer-series/12319824/model/16779281/document/c05365403 and https://support.hp.com/us-en/product/hp-deskjet-2600-all-in-one-printer-series/12319824/model/16779281/document/c05370810
If the information I've provided was helpful, give us some reinforcement by clicking the Accepted Solution and Kudos buttons, that'll help us and others see that we've got the answers!
Thanks!
Have a great day!
Welcome to HP support community.
You do not have the option to schedule printing quality report.
However, the printer automatically runs maintenance on itself to avoid cartridge drying up.
If you feel the printer maintenance is not done for a long time, you can manually clean the printhead.
On the printer control panel, swipe down to open the Dashboard, and then touch the Setup icon  .
.
Swipe up on the display, and then touch Printer Maintenance.
Touch Clean Printhead, and then touch Continue.
A test page prints.

To thank me for my efforts to help you, please mark my post as an accepted solution so that it benefits several others.
Cheers.
I reently purchased a new HP Envy 5660 all-in-one printer. It is connected by wi-fi to a Dell Lattitude E5570 laptop computer operating with Windows 7 SP 1. Adobe Reader XI is installed on the computer. Word and Excel files print OK. PDF files do not. I have tried selecting Print As Image frrom the advanced printer settings without success. I have tried reinstalling the printer driver without success.
My printer has stopped printing black, placed a new HP Cartrage, followed help information from troubleshooting, no black on paper when printing test sheets! Any ideas?
Greetings!
The following factors can cause paper jams:
Foreign objects (such as paper clips, coins, or rubber bands) might have fallen into the input tray.
Paper loaded incorrectly in the paper tray.
Damaged or dirty paper rollers.
Torn, wrinkled, or damp paper loaded in the paper tray.
The access door (on the rear or underside of the product) might not be closed securely.
Paper was added to a stack already in the tray while the HP product was printing.
The tray contains more than one type of paper.
The paper is jammed inside the HP product where you cannot see it.
An obstruction is blocking the paper path.
Torn pieces of paper from a previous jam are stuck in the product.
The tray is too full.
If printing on an envelope, the edges of the envelope are bent.
If the issue persists, though you have the above in check, click here to play the video on YouTube. on clearing the jams and resolving this issue,
Also, FOR DETAILS & FURTHER INSTRUCTIONS, USE THIS LINK: CLICK HERE (SCROLL DOWN & FOLLOW STEP 1 ONWARD)
(By the end of this article all the issues should be resolved)
Let me know how that pans out,
If you feel I was helpful, simply click on Accept as Solution to help the community grow,
That said, I will have someone follow-up on this to ensure you've been helped,
Just in case you don't get back to us within 24 - 48hrs, and have a good day, ahead.
Hi
Just playing about with Settings etc...and have found what I,m looking for.Printer is now connected to my Network..Happy Days..
Cheers
I'm currently experiencing issues with a constant "error state" message when printing. Sometimes it will still print, but it will print multiple pages of the same thing, while not printing others at all in the same document. I tried the fix detailed in the thread and got to the page where I manually configure the IP address. After entering all of the new numbers and clicking apply, I'm getting an error message that is asking me to correct the boxes in red, the Manual Default Gateway in this case, which says it's out of range. Please advise.
Thank you!
i cant print. Error code Oxc19a0002
Welcome to HP support community.
Perform root level uninstalltion to remove all the printer related software's.
Download and install printer full feature driver
Click here to download the driver
Update the printer firmware
Refer this HP document for the steps to update firmware:- Click here
Let me know if that helps.
To thank me for my efforts to help you, please mark my post as an accepted solution so that it benefits several others.
Cheers.
My printer is producing poor quality photo's. They are orange and blurred.
It's Fixed!!!
The first part of your post was no help. If you will look back, you should see that the dialogue box that pops up when I viewed the Printing Preferences had no option for color anywhere in it.
That being said, you did add a part in there that I haven't seen or been asked to try before. After removing the device, and running "printui.exe /s" and removing the driver (and installation packages, that's a step you didn't list), I downloaded and installed the basic 5540 Driver. That seemed to repair everything, and now I'm printing in glorious color! Thank you so much for sticking with me.
Welcome to HP support community.
As these instructions are particular for your printer model, I am sending you a private message. Please check the mailbox icon at the top-right corner of this screen.
To thank me for my efforts to help you, please mark my post as an accepted solution so that it benefits several others.
Cheers.

