Hi!
Don't worry I'll try to help you out. Let me ask you a few questions in order to assist you better.
Did you make any changes to your printer?
Have you tried checking with a different ink cartridge?
Are you using HP genuine ink cartridges on the printer?
Excellent description and a great diagnosis done. It is greatly appreciated.
I know the steps look long enough but it's worth a try to fix the issue.
Try the steps recommended below and check if it helps.
Update the printer firmware to the latest version.
Update the printer firmware using this link. Click Here
Try replacing the faulty, low or empty ink cartridges on your printer and check if it helps.
Try removing and reseating the print head back into the printer 3 times and check if the issue persists.
Reset the printer
Turn the printer on, if it is not already on.
Wait until the printer is idle and silent before you continue.
With the printer turned on, disconnect the power cord from the rear of the printer.
Unplug the power cord from the wall outlet.
Wait at least 60 seconds.
Plug the power cord back into the wall outlet.
note:
HP recommends connecting the printer power cord directly to the wall outlet.
Reconnect the power cord to the rear of the printer.
Turn on the printer, if it does not automatically turn on.
The printer might go through a warm-up period. The printer lights might flash, and the carriage might move.
Wait until the warm-up period finishes and your printer is idle and silent before you proceed.
Remove the printhead
If there is paper obstructing the printhead or if the printhead is not seated correctly, it might cause an error message. Turn on the printer, and then remove the printhead.
Press the Power button to turn on the printer, if it is not already on. Wait until the warm-up period finishes and your printer is idle and silent before you proceed.
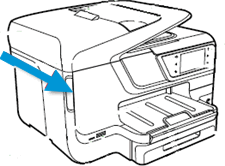
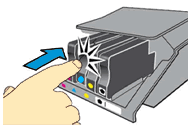
Place your fingers into the slot on the left side of the printer, and then pull to open the cartridge access door. Allow the carriage to move to the cartridge access area, and the carriage stops moving.
Figure : The slot on the side of the printer
![Image: The slot on the side of the printer.]()
Disconnect the power cord from the rear of the printer. Unplugging the printer prevents the carriage from moving.
WARNING:
You must disconnect the power cord before reaching inside the printer to avoid risk of injuries or electric shock.
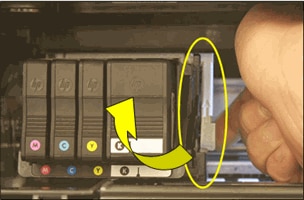
Lift the carriage latch.
Figure : Lift the carriage latch
![Image: Lift the carriage latch.]()
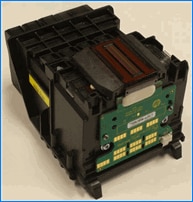
Grasp the sides of the printhead, gently lift and remove the printhead from the carriage.
NOTE:
Do not remove the cartridges from the printhead. You can safely remove the printhead with all of the cartridges inserted.
Figure : Remove the printhead
![Image: Remove the printhead.]()
CAUTION:
The nozzle area on the bottom of the printhead is fragile! Make sure that the bottom of the printhead does not bump or rub on the printer. Do not touch the nozzles or electrical contacts. Touching these areas can cause electrical failures or print quality problems.
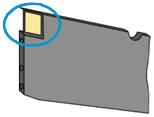
Figure : Nozzles and electrical contacts
Nozzles
Electrical contacts
Place the printhead assembly (with the cartridges still installed) upside down on a clean sheet of paper.
CAUTION:
Do not leave the printhead assembly outside of the printer for an extended period. Doing so can result in damage to the printhead or the printer.
Figure : Printhead upside down on a clean sheet of paper
![Image: Printhead upside down on a clean sheet of paper.]()

Clean the ink cartridges, and then check the error message
Cleaning the ink cartridge contacts, and then reinstalling the ink cartridges one at a time can help determine if a specific ink cartridge is causing the error message.
Gather the following materials:
A clean, lint-free cloth or a clean, dry cotton swab
Distilled or bottled water
CAUTION:
Do not use tap water because it might contain contaminants that can damage the printhead.
Lightly dampen a clean, lint-free cloth with bottled or distilled water.
Gently wipe the copper-colored contact on one of the ink cartridges.
Figure : Example of copper-colored contact
![Example of copper-colored contact]()
Wipe the contact with a dry, lint-free cloth before proceeding to the next step.
Repeat these steps for the three remaining ink cartridges.
Carefully reinsert each of the ink cartridges into its slot, and then push the ink cartridge down and forward until it clicks into place.
Figure : Reinserting the ink cartridge
![Reinserting the ink cartridge]()
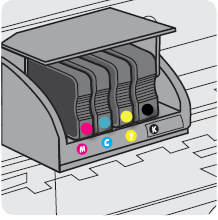
Make sure each colored dot on the ink cartridge label matches the colored dot on the print carriage.
Figure : Matching the colored dot on the print carriage
![Matching the colored dot on the print carriage]()
Close the ink cartridge access door.
Check the printer control panel to see if the error message persists.
If there is no error message, you can stop troubleshooting.
If the message is to Replace the
![]() ,
, ![]() ,
, ![]() , or
, or ![]() Ink Cartridge, remove the specified ink cartridge(s) and clean the copper-colored contact again, and then reinsert the ink cartridge(s).
Ink Cartridge, remove the specified ink cartridge(s) and clean the copper-colored contact again, and then reinsert the ink cartridge(s).
 ,
,  ,
,  , or
, or  Ink Cartridge, remove the specified ink cartridge(s) and clean the copper-colored contact again, and then reinsert the ink cartridge(s).
Refer this article to further troubleshoot ink system failure issues. Click Here
Let me know if this helps!
Have a great weekend ahead! :)
Please click “Accept as Solution” if you feel my post solved your issue, it will help others find the solution.
Click the “Kudos, Thumbs Up" on the bottom right to say “Thanks” for helping!