Thank you for joining HP Forums.
It's a pleasure assisting you in finding answers to your technical queries.
To provide you with an accurate solution, I'll need a few more details:
Are you using genuine HP ink cartridge?
I suggest you do a Hard Reset
(1) Turn the printer on, if it is not already on.
(2) Wait until the printer is idle and silent before you continue.
(3) With the printer turned on, disconnect the power cord from the rear of the printer.
(4) Unplug the power cord from the wall outlet.
(5) Wait at least 60 seconds.
(6) Plug the power cord back into the wall outlet.
NOTE: HP recommends connecting the printer power cord directly to the wall outlet.
(7) Reconnect the power cord to the rear of the printer.
(8) Turn on the printer, if it does not automatically turn on.
The printer might go through a warm-up period. The printer lights might flash, and the carriage might move.
Wait until the warm-up period finishes and your printer is idle and silent before you proceed.
Clean the ink cartridge vents and contacts
Clean the ink cartridge contacts and vents, and then reinstall the ink cartridges one at a time. This can help determine if a specific ink cartridge is causing the error message.
Gather the following materials:
A pin to clean any clogged vents
A clean, lint-free cloth
A clean, dry cotton swab
Distilled or bottled water
CAUTION:
Do not use tap water because it might contain contaminants that might damage the printhead.
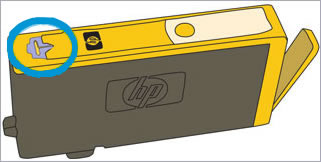
Examine the vent area located on top of the ink cartridge, next to the HP logo.
![Image: Example of the venta area.]()
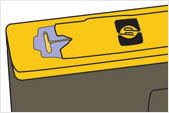
If any of the ink cartridges have clogged vents, use a pin to clean the vents.
Figure : Example of a clogged vent
![Image: Example of a clogged vent.]()
Figure : Example of a clean vent
![Image: Example of a clean vent.]()
Lightly dampen a fresh, lint-free cloth.
Wipe any accumulated ink and debris on the copper-colored contact on the ink cartridge.
CAUTION:
Be careful to wipe only the ink cartridge contacts. Do not smear any ink or debris elsewhere on the ink cartridge.
Ink cartridge contacts
Wipe the contact with a dry, lint-free cloth.
Repeat the steps to clean each ink cartridge contact.
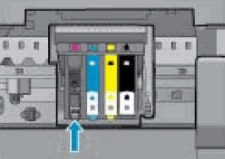
Lightly dampen a lint-free swab.
Wipe any accumulated ink and debris on the copper-colored contact on the printhead.
![Image: Example of the copper-colored contacts on the printhead]()
Wipe the contact with a dry, lint-free swab.
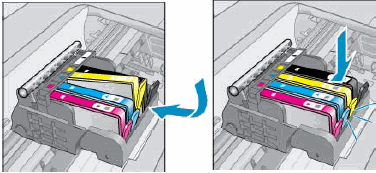
Reinsert each of the ink cartridges into its slot, and then push the ink cartridge forward and down until it snaps into place.
Make sure each colored dot on the ink cartridge label matches the colored dot on the carriage.
![Image: Snapping the ink cartridge into place]()
Run your finger along the top of the ink cartridges to make sure none of them protrude.
If any ink cartridges protrude, press down firmly until each ink cartridge snaps into place.
Close the ink cartridge access door.

Keep me posted, how it goes!
Have a great day!
Cheers:)