Hi!
I understand you have issues printing in cyan colour from your printer.
Don't worry I'll try to help you out.
Did you make any changes to your printer?
Does the issue persist when you make a copy from your printer?
Have you tried printing from a different application?
Have you tried printing using a different ink cartridge?
Excellent description and a great diagnosis done. It is greatly appreciated.
Replace low, empty or faulty ink cartridges on your printer.
Print a test page from your printer and check if the cyan colour is printing from your printer.
Try cleaning the printheads with ethanol and check if it helps.
Try the steps recommended below.
Clean the printhead
The printhead could be clogged, and you might need to clean the printhead several times to restore print quality. Use an automated tool from the printer control panel to clean the printhead.
From the printer control panel, open the Setup
![]() menu.
menu.Open the Printer Maintenance menu.
If necessary, open the Tools menu, and then touch Clean Printhead.
A test page prints.
![Example of the printhead cleaning test page]()
Examine the test page.
If the print quality is unacceptable, touch Clean Again to continue the next level of cleaning. If necessary, repeat these steps for the third cleaning cycle.
NOTE:
If the printhead is badly clogged, it might require another cleaning cycle. If so, wait 30 minutes before you perform all three levels of cleaning again.
 menu.
menu.
Replace any critically low or empty ink cartridges, and then try to print again. Skip this step if all ink cartridges display full ink levels.
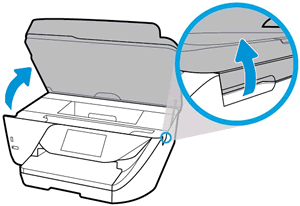
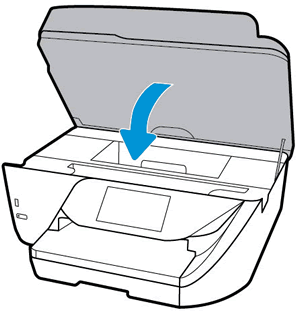
Open the ink cartridge access door.
The carriage moves to the ink cartridge access area.
NOTE:
If the scanner lid is open, the ink cartridge access door does not open.
Figure : Opening the ink cartridge access door
![Open the cartridge access door]()
Wait several seconds until the printer is idle and silent before you continue.
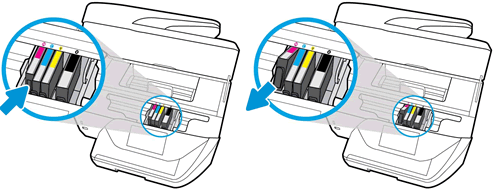
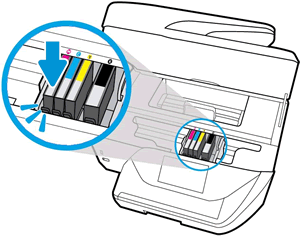
Press the tab inward on the front of the old ink cartridge to release it, and then pull up on the ink cartridge to remove it from the slot.
Figure : Removing the ink cartridge
![Pushing the ink cartridge inward and then pulling up to remove it]()
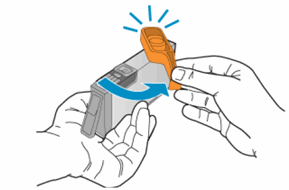
Remove a new ink cartridge from its package, and then pull the orange pull-tab straight back.
CAUTION:
Make sure you remove the orange pull-tab and plastic wrap completely before you remove the orange cap in the next step. Otherwise, ink might leak from the ink cartridge. When you remove the plastic wrap, the paper label on the top of the ink cartridge tears slightly, which is necessary to properly vent the ink cartridge.
Figure : Pulling the orange tab on the wrapper straight back
![Pull the orange tab straight back]()
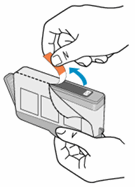
Hold the ink cartridge by its sides, and then twist the protective orange cap counter-clockwise to snap it off the ink cartridge.
Figure : Twisting the orange cap to snap it off the ink cartridge
![Twisting the orange cap to snap it off the ink cartridge]()
CAUTION:
Do not touch the copper-colored contacts or the ink nozzles. Touching these parts can result in clogs, ink failure, and bad electrical connections.
Gently bend the tab away from the ink cartridge.
CAUTION:
Be careful not to bend the tab out more than 1.27 cm (0.5 in). Moving the tab too far might damage the ink cartridge or cause the tab to break off.
Figure : Gently bending the tab away from the ink cartridge
Bend the tab away from the cartridge
Do not bend the tab more than 1.27 cm (0.5 in)
Turn the ink cartridge so that the ink cartridge contacts face downward, and then match the label color with the color dot on the carriage.
Slide the ink cartridge into its slot, and then gently press the ink cartridge down until it snaps into place.
Figure : Installing the ink cartridge
![Reinserting the ink cartridge]()
Repeat these steps to install any new ink cartridges.
Close the ink cartridge access door.
Figure : Closing the ink cartridge access door
![Closing the ink cartridge access door]()
Refer this article to further troubleshoot print quality issues with your printer. Click here
Let me know if this helps!
Have a beautiful day ahead! :)
Please click “Accept as Solution” if you feel my post solved your issue, it will help others find the solution.
Click the “Kudos, Thumbs Up" on the bottom right to say “Thanks” for helping!