Welcome to HP Forums,
This is a great place to get support, find answers and tips to your technical queries.
Appreciate all your time and efforts.
If you have already tried all the steps mentioned below,
Step 1: Check the paper pick roller position
If the paper pick roller is not positioned correctly, the printer does not sense the original when it is loaded.
Remove any paper from the ADF.
Touch OK to clear the error message, and then look at the paper pick roller:
If the paper pick roller is up (not visible), the roller is in the correct position. Reload the originals, and then try to scan or copy again.
Figure : Correct position of ADF paper pick roller
![The correct position of the paper pick roller, when it is up and not visible]()
If the paper pick roller is down (visible), the roller is in the incorrect position.
Figure : Incorrect position of ADF paper pick roller
![The incorrect position of the paper pick roller, when it is down and not visible]()
Turn the printer off, and then on.
Check the paper pick roller. It should be reset, and in the "up" position.
Reload the original, pushing with moderate force until the paper stops. You should hear a sound, and an Original loaded message should display on the printer control panel.
Try to scan or copy again.


If the issue persists, continue to the next step.
Step 2: Check the paper, and then reload it
Make sure the paper you scan or copy is in good condition, is neatly stacked in the tray, and the paper path and tray are free from obstructions.
NOTE:The edges of paper that has absorbed moisture might curl or lift the sheet so the paper does not feed into the ADF. Likewise, the ADF might not feed photo paper or other paper types with glossy surfaces. If you are unsure of the type of paper you should send through the ADF, use the flatbed scanner.
Remove the paper from the ADF.
Remove any severely bent, wrinkled, or torn paper from the stack.
Make sure there are no paper clips or staples in the paper.
For testing purposes, obtain 10 sheets of new, plain white paper with a weight of 60 to 90 g/m2 (16 to 24 lb bond).
Tap the stack of paper on a flat surface to align the edges.
Load the stack of paper into the ADF input tray. Make sure the stack is inserted fully into the input tray and that the printer recognizes that paper has been loaded. When paper is properly loaded into the ADF, the printer should make a sound and display Original loaded on the printer control panel.
Slide in the paper width guides until they rest against the edges of the paper.
Try to copy or scan using the ADF again.
If the ADF picked all the sheets in the stack of paper, reload your originals, and then try to copy or scan again.
If the ADF did not pick all sheets in the stack of paper, continue to the next step.
Step 3: Clean the ADF rollers and the separator pad
Clean the paper feed rollers and separator pad in the ADF.
Gather the following materials:
A lint-free cloth
Distilled, filtered, or bottled water (tap water might damage the printer)
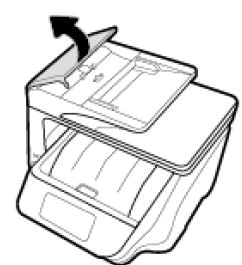
Lift the cover of the ADF.
![Image: Lifting the ADF cover]()
Lightly dampen a clean, lint-free cloth with bottled or distilled water, and then squeeze any excess liquid from the cloth.
Press the cloth against the rollers, and then rotate them upward with your fingers. Apply a moderate amount of pressure to remove any dust or dirt buildup.
Rollers
Separator pad
Allow the rollers to dry completely (approximately 10 minutes).
Close the ADF cover tightly at both ends.
Try to print.
If the issue persists, Click on this link: https://support.hp.com/sg-en/product/hp-officejet-pro-8720-all-in-one-printer-series/7902032/document/c02919168 to update the firmware for the printer.
Restart the printer.
Keep me posted, how it goes!
If the information I've provided was helpful, give us some reinforcement by clicking the Accepted Solution and Kudos buttons, that'll help us and others see that we've got the answers!
Have a great day!
Cheers:)