Welcome to HP Forums,
This is a great place to get support, find answers and tips to your technical queries.
To provide you with an accurate solution, I'll need a few more details:
Are you using genuine HP Ink cartridge?
Did you try with a different Ink cartridge?
I suggest you do a Hard Reset
(1) Turn the printer on, if it is not already on.
(2) Wait until the printer is idle and silent before you continue.
(3) With the printer turned on, disconnect the power cord from the rear of the printer.
(4) Unplug the power cord from the wall outlet.
(5) Wait at least 60 seconds.
(6) Plug the power cord back into the wall outlet.
NOTE: HP recommends connecting the printer power cord directly to the wall outlet.
(7) Reconnect the power cord to the rear of the printer.
(8) Turn on the printer, if it does not automatically turn on.
The printer might go through a warm-up period. The printer lights might flash, and the carriage might move.
Wait until the warm-up period finishes and your printer is idle and silent before you proceed.
HP customizes some printers and ink cartridges to meet local customer needs. If you take your printer from one country/region to another country/region, you might not find ink cartridges with the same number on the label as your original ink cartridges. If you install an ink cartridge with a different number on the label, you might see one of the following error messages:
Incompatible Cartridges
Cartridge Not Intended for this Printer
Incorrect Cartridges
Clean the area around the ink nozzles
Complete these steps only if you see track marks or smears in the text on the test page or on your printout.
Gather the following materials:
Dry foam-rubber swabs, lint-free cloth, or any soft material that does not come apart or leave fibers (coffee filters work well)
Clean sheets of paper
Distilled, filtered, or bottled water (tap water might contain contaminants that can damage the print cartridges)
CAUTION:
Do not use platen cleaners or alcohol to clean the area. These can damage the cartridge or the printer.
Press the Power button (
![]() ) to turn on the printer, if it is not already on.
) to turn on the printer, if it is not already on.Open the scanner lid.
Open the cartridge access door. The carriage moves to the center of the printer. Wait until the carriage is idle and silent before continuing.
Figure : Open the cartridge access door
![Image: Open the cartridge access door.]()
Lift the cartridge latch to release the cartridge, and then pull the cartridge out of the slot to remove it.
Figure : Lift the cartridge latch and remove the cartridge
![Image: Lift the cartridge latch and remove the cartridge.]()
CAUTION:
Do not touch the copper-colored contacts or the ink nozzles on the cartridge. Touching these parts can result in clogs, ink failure, and bad electrical connections.
Place the cartridge on a piece of paper with the ink nozzles facing up.
Lightly moisten a clean, foam-rubber swab with distilled water.
Clean the face and edges around the ink nozzle with the swab.
CAUTION:
Do not clean the ink nozzle plate.
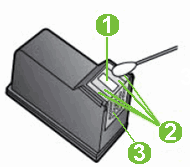
Figure : Clean the area around the ink nozzle
![Image: The ink nozzle and cartridge contacts.]()
Nozzle plate - DO NOT CLEAN
Area surrounding ink nozzle - Do clean
Cartridge contacts - DO NOT CLEAN
Either let the cartridge sit for 10 minutes to allow the cleaned area to dry, or use a new swab to dry it.
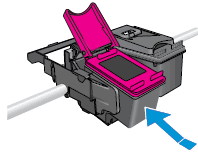
Hold the cartridge at a slight upward angle with the cartridge contacts facing the rear of the printer, and then slide the cartridge into the empty slot.
Figure : Reinstall the cartridge
![Image: Reinstall the cartridge.]()
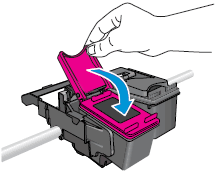
Close the cartridge latch to secure the cartridge into place.
Figure : Close the cartridge latch
![Image: Close the cartridge latch.]()
Repeat these steps to clean the area surrounding the ink nozzle on the other cartridge.
Close the cartridge access door.
Figure : Close the cartridge access door
![Image: Close the cartridge access door.]()
Close the scanner lid.
Try printing again.
 ) to turn on the printer, if it is not already on.


Use this link: https://support.hp.com/us-en/product/hp-envy-120-e-all-in-one-printer-series/5203208/document/c03390042 for your reference.
Keep me posted, how it goes!
If the information I've provided was helpful, give us some reinforcement by clicking the Accepted Solution and Kudos buttons, that'll help us and others see that we've got the answers!
Have a great day!
Cheers:)