Welcome to the HP Forums, this is a great location to get assistance! I read your post and see that you are getting ink system failure. I would like to help you resolve this issue.
However, I will need a few details to provide an accurate solution,
When did this issue start?
Did you do any hardware or software changes?
How is the printer connected to computer, wired or wireless?
Meanwhile
Reset the printer
Turn the printer on, if it is not already on.
Wait until the printer is idle and silent before you continue.
With the printer turned on, disconnect the power cord from the rear of the printer.
Unplug the power cord from the wall outlet.
Wait at least 60 seconds.
Plug the power cord back into the wall outlet.
note:
HP recommends connecting the printer power cord directly to the wall outlet.
Reconnect the power cord to the rear of the printer.
Turn on the printer, if it does not automatically turn on.
The printer might go through a warm-up period. The printer lights might flash, and the carriage might move.
Wait until the warm-up period finishes and your printer is idle and silent before you proceed.
Clean the ink cartridges, and then check the error message
Gather the following materials:
A clean, lint-free cloth or a clean, dry cotton swab
Distilled or bottled water
caution:
Do not use tap water because it might contain contaminants that can damage the printhead.
Lightly dampen a clean, lint-free cloth with bottled or distilled water.
Gently wipe the copper-colored contact on one of the ink cartridges.
Figure : Example of copper-colored contact
![Example of copper-colored contact]()
Wipe the contact with a dry, lint-free cloth before proceeding to the next step.
Repeat these steps for the three remaining ink cartridges.
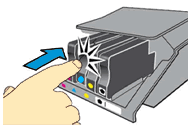
Carefully reinsert each of the ink cartridges into its slot, and then push the ink cartridge down and forward until it clicks into place.
Figure : Reinserting the ink cartridge
![Reinserting the ink cartridge]()
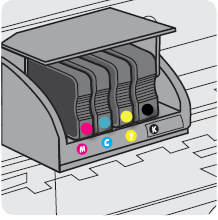
Make sure each colored dot on the ink cartridge label matches the colored dot on the print carriage.
Figure : Matching the colored dot on the print carriage
![Matching the colored dot on the print carriage]()
From the home screen on the printer control panel, touch the HP ePrint icon
![]() .
.Wait for the printer to connect to the HP ePrint server.
When the printer connects to the server, the HP ePrint status displays.
Touch Settings on the bottom left corner of the screen.
Touch Printer Update, and then touch Check for Update Now.
 .
.Reseat the printhead up to three times
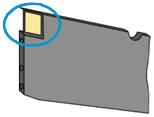
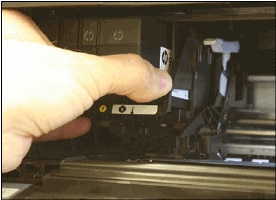
Slip your fingers into the slot on the left side of the printer, and then pull forward to open the cartridge access door. The carriage moves to the left side of the printer. Wait until the carriage is idle and silent before proceeding.
Figure : Open the cartridge access door
Slot on the left side of the printer
Unplug the power cord from the rear of the printer. Unplugging the printer prevents the carriage from moving.
warning:
You must disconnect the power cord before reaching inside the printer to avoid risk of injuries or electric shock.
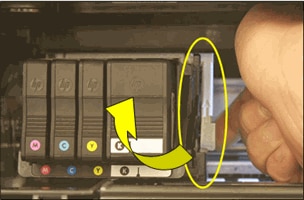
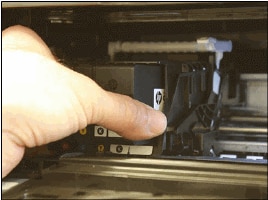
Lift the carriage latch.
Figure : Lift the carriage latch
![Image: Lift the carriage latch.]()
Grasp the sides of the printhead, and then slightly lift the printhead without fully removing it from the carriage.
Figure : Slightly lift the printhead
![Image: Slightly lift the printhead.]()
Reinsert the printhead into the carriage to reseat it. As you guide the printhead into the carriage, it lowers into the carriage as it seats.
Figure : Reseat the printhead
![Image: Reseat the printhead.]()
Gently rock the printhead to the left and right to make sure that the printhead fully seats in the carriage.
Lower the carriage latch.
Figure : Lower the carriage latch
![Image: Lower the carriage latch.]()
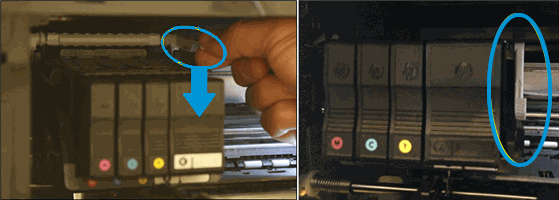
Verify that the carriage latch is down.
Figure : Carriage latch positions
Carriage latch is up
Carriage latch is down
Close the cartridge access door.
Reconnect the power cord to the rear of the printer.
If the printer does not turn on by itself, press the Power button to turn it on.
Wait until the warm-up period finishes and your printer is idle and silent before you proceed.
Update the printer firmware
From the home screen on the printer control panel, touch the HP ePrint icon
![]() .
.Wait for the printer to connect to the HP ePrint server.
When the printer connects to the server, the HP ePrint status displays.
Touch Settings on the bottom left corner of the screen.
Touch Printer Update, and then touch Check for Update Now.
Click here and refer the HP Document for more assistance.
Let me know how it goes.
Cheers.