Hi @Douglas1959,
Welcome to the HP Support Community
I understand you are facing an issue with your HP OfficeJet 4650 showing a warning Service Station Stalled. . Not to worry I will help you to get a resolution to resolve the issue.
Let's perform a power drain:
- With the printer turned on, disconnect the power cord from the rear of the printer and also unplug the power cord from the wall outlet.
- Remove the USB cable, if present.
- Wait for 2-3 minutes, press and hold the power button on your printer for about 30 seconds to remove any additional charge.
- Now plug back the power cable straight to a wall outlet without any surge protector or an extension cord (This is important) and then plug back the power cord to the printer.
- Turn on the printer and wait till the warm-up period finishes and the printer is idle
Update the printer firmware
- Click here to download and install the latest printer firmware from your product
- Click here to know different methods of updating the printer firmware.
However, I will need a few details to provide an accurate solution,
When did this issue start?
Did you do any hardware or software changes?
How is the printer connected to a computer, wired or wireless?
Meanwhile
Remove and reinstall the ink cartridges
Turn on the printer, if it is not on already.
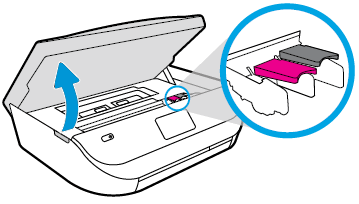
Gently grasp the handles on either side of the printer, then raise the ink cartridge access door until it locks into place.
The carriage moves to the center of the printer.
Figure : Opening the ink cartridge access door
Wait until the carriage is idle and silent before you proceed.
To release the ink cartridge, lift the lid on the ink cartridge slot, then gently push the lid back until it stops.
Pull up on the ink cartridge to remove it from the slot.
Figure : Removing the ink cartridge
Lift the lid
Gently push the lid back
Pull up on the ink cartridge
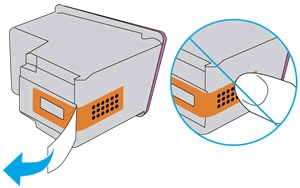
Inspect the contacts for any protective tape that still might be on the nozzles.
CAUTION:
Do not touch the copper-colored contacts or the ink nozzles. Touching these parts can result in clogs, ink failure, and bad electrical connections.
Remove the protective tape from the contacts, if necessary.
CAUTION:
Do not try to remove the copper electrical strip.
Figure : Removing the plastic tape
Hold the ink cartridge by its sides with the nozzles toward the printer, then slide the ink cartridge forward into the slot.
Close the lid on the ink cartridge slot to secure the ink cartridge into place.
Figure : Inserting the ink cartridges
Insert the ink cartridge
Close the lid
The color ink cartridge is on the left, and the black ink cartridge is on the right
Repeat the previous steps to remove, inspect, and reseat the other ink cartridge, if necessary.
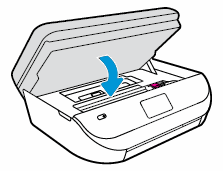
Close the ink cartridge access door.
Figure : Closing the ink cartridge access door.
Try to print.
Plug the printer directly into a wall outlet
Disconnect the power cord from the rear of the printer.
Unplug the power cord from any power strips or surge suppressors.
Plug the power cord directly into an electrical outlet.
Reconnect the power cord to the rear of the printer.
Turn on the printer.
Reset the printer
Turn the printer on, if it is not already on.
Wait until the printer is idle and silent before you continue.
With the printer turned on, disconnect the power cord from the rear of the printer.
Unplug the power cord from the wall outlet.
Wait at least 60 seconds.
Plug the power cord back into the wall outlet.
NOTE:
HP recommends connecting the printer power cord directly to the wall outlet.
Reconnect the power cord to the rear of the printer.
Turn on the printer, if it does not automatically turn on.
The printer might go through a warm-up period. The printer lights might flash, and the carriage might move.
Wait until the warm-up period finishes and your printer is idle and silent before you proceed.
Try to print.
Click here and refer the document to perform the above steps.
Hope this helps! Keep me posted.
Please click “Accepted Solution” if you feel my post solved your issue, it will help others find the solution. Click the “Kudos/Thumbs Up" on the bottom right to say “Thanks” for helping!