Hey
Welcome to the HP Support Forum. 
I see that you're encountering an ink system error on your HP Officejet 6700 Premium e-All-in-One Printer. I would like to assist you with this.
I recommend you try the following steps:
In some cases, a printer reset can clear the error.
- Press the Power button (
![]() ) to turn on the product.
) to turn on the product. - With the product turned on, disconnect the power cord from the rear of the product.
- Unplug the power cord from the wall outlet.
- Wait at least 15 seconds.
- Plug the power cord back into the wall outlet.
- Reconnect the power cord to the rear of the product.
- If the product does not turn on by itself, press the Power button (
![]() ) to turn it on.
) to turn it on.
 ) to turn on the product.
If the error message persists, continue to the next step.
Removing the ink cartridges and checking for an error message can help diagnose the printer issue. Take all the ink cartridges out of the printhead, and then check the control panel for an error message.
- Open the ink cartridge access door.The carriage moves to the left side of the access area.
- Wait until the print carriage is idle and silent before proceeding.
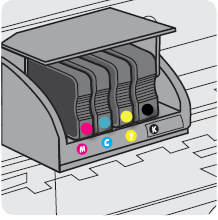
- Make sure that each colored dot on the ink cartridge labels matches the colored dot on the carriage slot it's inserted into.Figure : The colored dot on the ink cartridge label should match the colored dot on the carriage slot
![Image: Colored dots on ink cartridge labels should match the colored dots on the carriage slots]()
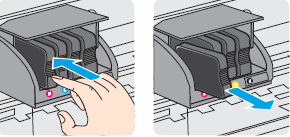
- Push in on the front of one of the ink cartridges to release it, and then pull the ink cartridge toward you to remove it from its slot.Figure : Remove the cartridge from its slot
![Image: Remove a cartridge from its slot]()
- Repeat these steps for the other cartridges.
- Close the ink cartridge access door.
- Check the control panel to see if an error message displays.
- If the printer displays an 'Ink System Failure' message on the control panel, then skip to Update the printer firmware.
- If the message has changed to 'Replace the (
![]() ), (
), (![]() ), (
), (![]() ), or (
), or (![]() ) Ink Cartridge' then continue to the next step.
) Ink Cartridge' then continue to the next step.
 ), (
), ( ), (
), ( ), or (
 )
) Cleaning the ink cartridge contacts, and then reinstalling the ink cartridges one at a time can help determine if a specific ink cartridge is causing the error message.
- Gather the following materials:
- Distilled or bottled water (tap water can damage the ink cartridges)
- A clean, lint-free cloth
- A clean, dry cotton swab
- Lightly dampen a clean, lint-free cloth with bottled or distilled water.
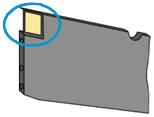
- Gently wipe the copper-colored contact on one of the ink cartridges.Figure : Copper-colored contact on the ink cartridge
![Image: Copper-colored contact on the ink cartridge]()
- Wipe the contact with a dry lint-free cloth before proceeding to the next step.
- Repeat steps 2-4 for the three remaining ink cartridges.
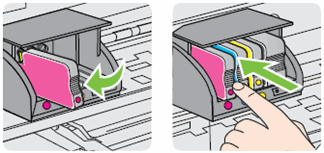
- Carefully reinsert one of the cartridges into its slot, and then push the ink cartridge forward until it clicks into place.Figure : Push the ink cartridge forward in the slot until it clicks into place
![Image: Push the ink cartridge forward in the slot until it clicks into place]()
- Close the ink cartridge access door.
- Check the printer control panel to see if the error message persists.
- If the 'Ink System Failure' message displays, replace the ink cartridge you just reinstalled. If you have replaced the ink cartridge and the error message persists, continue to the next step.
- If the message has changed to 'Replace the (
![]() ), (
), (![]() ), (
), (![]() ), or (
), or (![]() ) Ink Cartridge' then repeat steps 7-9 for each indicated ink cartridge remaining. If you have cleaned and replaced all of the ink cartridges and the 'Ink System Failure' message displays, continue to the next step.
) Ink Cartridge' then repeat steps 7-9 for each indicated ink cartridge remaining. If you have cleaned and replaced all of the ink cartridges and the 'Ink System Failure' message displays, continue to the next step. - If the error message does not display, you do not need to continue troubleshooting.
The error might occur if the printer has out-dated firmware. Download a firmware update from the HP website, and then install it on your printer.
- Turn on the printer.
- Disconnect the USB cable from the printer and the computer (if you already connected it). If the printer is connected to your network, leave it connected.
- Use one of the available methods to identify your printer model.The Software and driver results page displays when the printer model is identified.Figure : Example of the Software and driver results page
![Image: Example of the Software and driver results window]()
- Check to see if your operating system is correctly identified. If your operating system is not correct, click Edit, select your operating system and version from the drop-down menus, and then click Update.
- Click Firmware, and then click Download.
- If an HP Download and Install Assistant window displays, select Use HP Download and Install Assistant (Recommended) or Download only, and then click Next.Figure : Example of the HP Download and Install Assistant window
![Image: Example of the HP Download and Install Assistant window]()
- Follow the on-screen instructions to save the driver to your computer.
- If you used the Download only method, open or run the driver file, then follow the on-screen instructions to install the software.


Please let me know the result of your troubleshooting by responding to this post. If I have helped you resolve the issue, feel free to give me a virtual high-five by clicking the 'Thumbs Up' icon below and clicking to accept this solution.
Thank you for posting in the HP Support Forum. Have a great day!