Welcome to HP support community.
Manually clean the paper feed rollers
Gather the following materials:
Long, lint-free cotton swabs
A clean, lint-free cloth, or any cloth that does not come apart or leave fibers
Distilled, filtered, or bottled water (tap water might damage the printer)
Turn on the printer, if it is not already on.
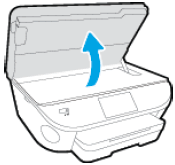
Gently grasp the handles on either side of the printer, then raise the ink cartridge access door until it locks into place.
The carriage moves to the center of the printer.
Figure : Opening the ink cartridge access door
![Image: Opening the ink cartridge access door.]()
Wait until the printer is idle and silent before you continue.
While the printer is still on, disconnect the power cord from the rear of the printer, and then unplug the power cord from the power source or electrical outlet.
WARNING:
You must disconnect the power cord before reaching inside the printer to avoid the risk of injuries or electric shock.
Disconnect the USB cable from the rear of the printer, if you have a cable connection to the computer.
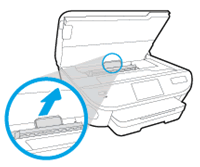
Locate the paper path cover, grasp the handle, and then lift up to remove it.
Figure : Removing the paper path cover
![Image: Locating the paper path cover.]()
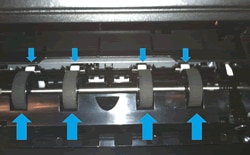
Lightly dampen the swab with the water, and then squeeze any excess liquid from the swab.
Use a flashlight to inspect the rollers. Press the swab against the rollers inside the printer, and then rotate the rollers upwards with your fingers.
Apply a moderate amount of pressure to remove any dust or dirt buildup.
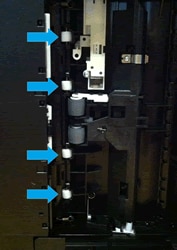
Figure : Example of the rollers in the paper path access area
![Image: Example of the rollers in the paper path access area.]()
Allow the rollers to dry completely (approximately 10 minutes).
Replace the paper path cover, and then close the ink cartridge access door.
Figure : Closing the ink cartridge access door
![Image: Closing the ink cartridge access door.]()
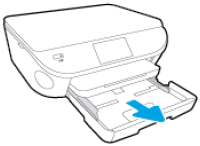
Grasp the output tray, and then pull toward you to remove it.
Pull out the input tray to its outermost position.
Figure : Pulling out the input tray
![Image: Pulling out the input tray.]()
Remove all paper from the input tray.
Turn the printer onto its right side so you can access its underside. Make sure to hold the printer firmly with one hand to avoid tipping.
Figure : Turning the printer onto its right side
![Image: Turning the printer onto its right side.]()
Lightly dampen a clean, lint-free cloth with bottled or distilled water, and then squeeze any excess liquid from the cloth.
Inspect the gap where the input tray was with a flashlight. Press the cloth against the rollers, and then rotate them upward with your fingers. Apply a moderate amount of pressure to remove any dust or dirt buildup.
Figure : Example of the rollers underneath the printer
![Image: Example of the rollers underneath the printer.]()
Allow the rollers to dry completely (approximately 10 minutes).
Push in the input tray, and then return the printer to its normal position.
Slide the output tray back onto the input tray.
Reconnect the power cord to the rear of the printer, and then plug in the power cord to an electrical outlet.
Reconnect the USB cable, if your printer has a cable connection to the computer.
Turn on the printer.


You can refer this HP support community for more assistance:- Click here
(Note:- Though the title of the document is different, these steps should fix the issue)
I hope that helps.
To thank me for my efforts to help you, please mark my post as an accepted solution so that it benefits several others.
Cheers.