I suggest you do a Hard Reset on the printer
(1) Turn the printer on, if it is not already on.
(2) Wait until the printer is idle and silent before you continue.
(3) With the printer turned on, disconnect the power cord from the rear of the printer.
(4) Unplug the power cord from the wall outlet.
(5) Wait at least 60 seconds.
(6) Plug the power cord back into the wall outlet.
NOTE: HP recommends connecting the printer power cord directly to the wall outlet.
(7) Reconnect the power cord to the rear of the printer.
(8) Turn on the printer, if it does not automatically turn on.
The printer might go through a warm-up period. The printer lights might flash, and the carriage might move.
Wait until the warm-up period finishes and your printer is idle and silent before you proceed.
Clean the ink cartridge and printhead contacts
Remove the ink cartridges to clean the ink cartridge and printhead contacts and then reinstall the ink cartridges into the printer.
CAUTION:Clean the ink cartridges one at a time. Do not leave an ink cartridge outside of the printer for more than 30 minutes. Also, never turn off the printer when an ink cartridge is removed from its slot. Leaving ink cartridge slots empty might cause damage to the ink cartridge ink system.
Gather the following materials:
A clean, lint-free cloth
A clean, dry cotton swab
Distilled or bottled water
CAUTION:
Do not use tap water, platen cleaners, or alcohol because they might contain contaminants that can damage the contacts.
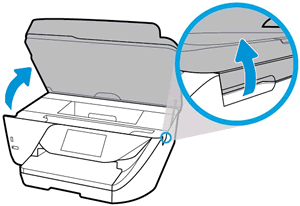
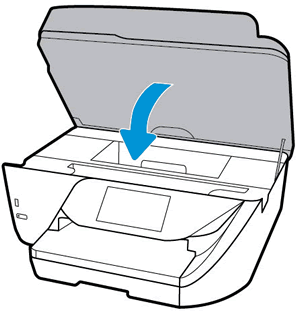
Open the ink cartridge access door.
The carriage moves to the left side of the printer.
NOTE:
If the scanner lid is open, the ink cartridge access door does not open.
![Open the cartridge access door]()
Wait until the printer is idle and silent before you proceed.
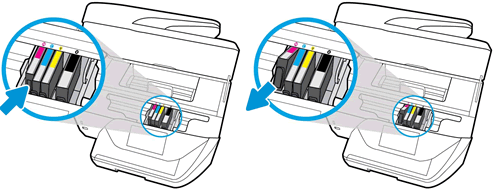
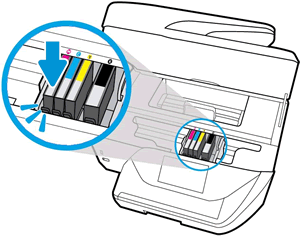
Press the tab inward on the front of the ink cartridge to release it, and then pull up on the ink cartridge to remove it from the slot.
![Pushing the ink cartridge inward and then pulling up to remove it]()
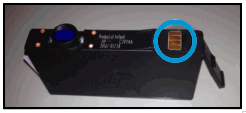
Lightly dampen a clean, lint-free cloth with bottled or distilled water.
![Copper-colored ink cartridge contact]()
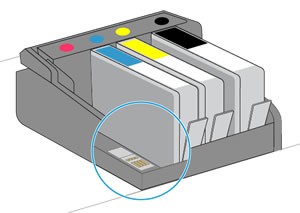
Place the cartridge to the side, with the contacts facing upwards.
Moisten the cotton swab, and then wipe the contacts inside the printhead.
![Clean the printhead contacts]()
Carefully reinsert the ink cartridge into its slot, and then press down on the ink cartridge until it clicks into place.
![Reinserting the ink cartridge]()
NOTE:
Make sure you insert the ink cartridge into the slot that has the same colored letter as the color you are installing.
Repeat these steps for other ink cartridges, if necessary.
Close the ink cartridge access door.
![Closing the ink cartridge access door]()
Clean the printhead
The printhead could be clogged, and you might need to clean the printhead several times to restore print quality. Use an automated tool from the printer control panel to clean the printhead.
CAUTION:Never turn off the printer when ink cartridges are not installed. To avoid issues that require cleaning the printhead or that can damage the ink system, always replace ink cartridges as soon as possible, and always turn off the printer using the Power button.
From the printer control panel, open the Setup
![]() menu.
menu.Open the Printer Maintenance menu.
If necessary, open the Tools menu, and then touch Clean Printhead.
A test page prints.
![Example of the printhead cleaning test page]()
Examine the test page.
If the print quality is unacceptable, touch Clean Again to continue the next level of cleaning. If necessary, repeat these steps for the third cleaning cycle.
NOTE:
If the printhead is badly clogged, it might require another cleaning cycle. If so, wait 30 minutes before you perform all three levels of cleaning again.
If the print quality is acceptable, touch Done.
 menu.
menu.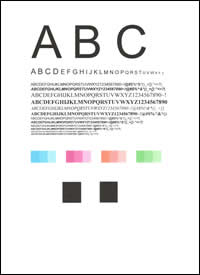
Try to print.
Keep me posted, how it goes!
If the information I've provided was helpful, give us some reinforcement by clicking the Accepted Solution and Kudosbuttons, that'll help us and others see that we've got the answers!
Welcome to the HP Community.
Have a great day!
Cheers:)