Quantcast
Channel: All Printing Errors or Lights & Stuck Print Jobs posts
Viewing all 313454 articles
Browse latest View live

Re: INK CLUB

$
0
0

Hey there! , Thanks for stopping by the HP Support Forums!


I understand you have issues enrolling in instant ink program.


Don't worry I'll try to help you out.


Did you make any changes to your printer?


Have you tried checking with a different ink cartridge?


Please share the printer model and operating system you are running on your PC to assist you better.


As you mentioned you have issues enrolling in instant ink program and your printer is offline.


Refer this article to know more information about Enrolling in HP Instant Ink.


Refer this article to know more information about instant ink.


If you have any issues in enrolling in the instant ink, Please share few the details in a private message So I can help you in registering your instant ink account. 


Printer Model Name

Serial Number of the printer

Instant ink Email Address

Instant Ink Account Number


Also, refer this article to further troubleshoot printer offline issues.


If the solution provided worked for you, please mark accepted solution for this post.


Hope this answers your query!


I hope you have a great day! Smiley Happy


Please click “Accept as Solution” if you feel my post solved your issue, it will help others find the solution.


Click the “Kudos, Thumbs Up" on the bottom right to say “Thanks” for helping!


Re: Error Code 0:0x6203d0b1

$
0
0


Welcome to the HP Forums, this is a great location to get assistance! I read your post and see that you are getting Error Code 0:0x6203d0b1 on HP Photosmart 7510 Printer. I would like to help you resolve this issue. 


However, I will need a few details to provide an accurate solution,

  • When did this issue start?
  • Did you do any hardware or software changes?
  • how is the printer connected to computer?

Meanwhile

Clean the printhead

  1. Gather the following cleaning materials:

    • Several clean, lint-free cloths or papers. Coffee filters and glass-cleaning cloths work well.

    • Distilled or bottled water. Do not use tap water. Tap water can contain contaminants that can damage the printhead.

  2. Lightly dampen a clean, lint-free cloth.

  3. Use the damp cloth to wipe the electrical contacts from the bottom to the top. Do not go past the edge between the electrical contacts and the ink nozzles. Repeat this motion until no ink appears on the cloth.

    Figure : Clean the electrical contacts

    Image: Clean the electrical contacts
  4. Use a fresh, lightly dampened, lint-free cloth to wipe any accumulated ink and debris from the edge between the ink nozzles and the electrical contacts.

    Figure : Clean the edge between the ink nozzles and the electrical contacts

    Image: Clean the edge between the ink nozzles and the electrical contacts
  5. Use a fresh, lightly dampened, lint-free cloth to wipe the plastic ramps on both sides of the ink nozzles. Wipe away from the nozzles only.

    Figure : Clean the ramps

    Image: Clean the ramps
  6. Dry the previously cleaned areas with a clean, dry, lint-free cloth.

  7. Lightly dampen a fresh, clean, lint-free cloth with bottled or distilled water.

  8. Clean the electrical contacts inside the printer by wiping them from top to bottom. Repeat this motion until no ink appears on the cloth.

    Figure : Clean the electrical contacts inside the printer

    Image: Clean the electrical contacts inside the printer
  9. Dry the area with a clean, dry, lint-free cloth.

Reinstall the printhead and cartridges

  1. Hold the printhead upright with the colored icons on the top.

  2. Lower the printhead into the carriage.

    Figure : Reinstall the printhead

    Image: Reinstall the printhead
  3. Carefully lower the latch handle.

    Figure : Lower the latch handle

    Image: Lower the latch handle

       CAUTION:

    Leaving the latch handle raised can result in incorrectly seated cartridges. The latch must remain down to install the cartridges correctly.

  4. With the nozzle and contacts facing down, slide the cartridges into their slots. Press down on the cartridge until it clicks into place. Make sure that the colored icon on the cartridge label matches the colored icon on the carriage slot.

    Figure : Reinstall each cartridge

    Image: Reinstall each cartridge
  5. Close the cartridge access door. The carriage returns to the right side of the printer.

Reset the printer

  1. Press the Power button () to turn on the product.

  2. With the product turned on, disconnect the power cord from the rear of the product.

  3. Unplug the power cord from the wall outlet.

  4. Wait at least 15 seconds.

  5. Plug the power cord back into the wall outlet.

  6. Reconnect the power cord to the rear of the product.

  7. If the product does not turn on by itself, press the Power button () to turn it on.

Click here and refer the document for more assistance.


Let me know how it goes.

Cheers.

Re: Poor Photo images

$
0
0


Hi ,


Thanks for engaging in HP support Forums! This is a wonderful location to converse with the community, get assistance and find tips! I understand you are having issues while printing in color from your HP Envy printer. Don't worry as I have a few suggestions which should help you resolve this issue.


To provide you with an accurate solution, I'll need a few more details:

Have you recently made any changes on the printer before the issue started?

Are you using genuine HP ink cartridges or refilled cartridges?

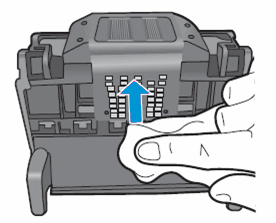
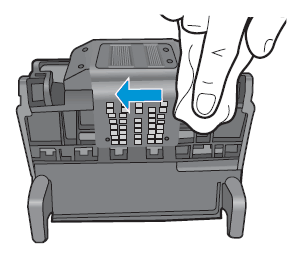
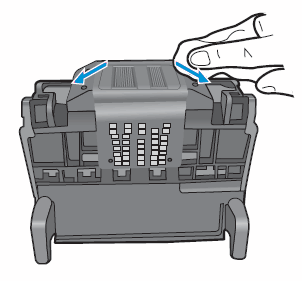
Have you tried to clean the ink cartridge contacts?

Are you able to make a copy from the printer?


In the meantime, let's try these steps here: 


Please make sure that the printer is connected directly to the wall outlet and not to the surge protector.

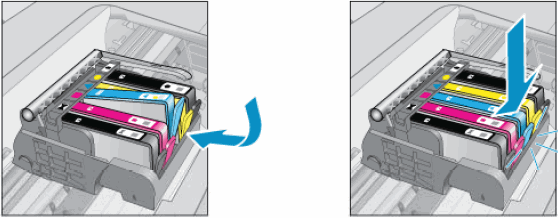
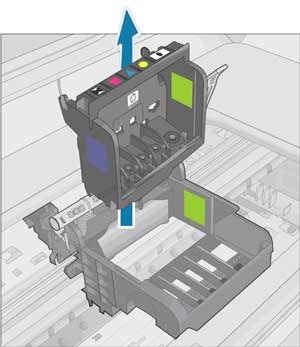
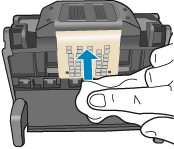
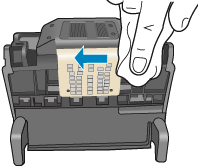
Remove all the ink cartridges and then try to perform a hard reset on the printer.

With the printer turned on, disconnect the power cord from the rear of the printer and also unplug the power cord from the wall outlet.

Remove USB cable, if present.

Wait for 2-3 minutes, press and hold the power button on your printer for about 30 seconds to remove any additional charge.

Now plug back the power cable straight to a wall outlet without any surge protector or an extension cord and then plug back the power cord to the printer.

Turn on the printer and wait till warm-up period finishes and the printer is idle.

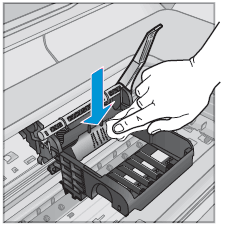
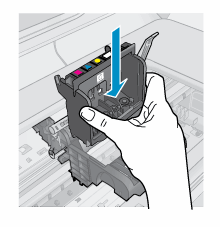
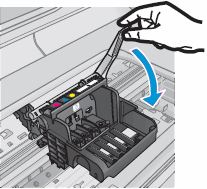
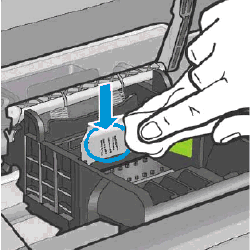
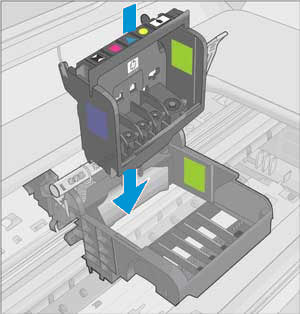
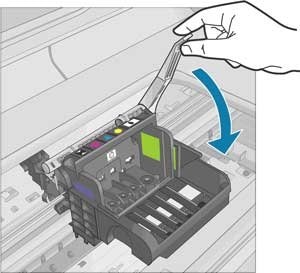
Now insert the ink cartridges and then try to print a test page and check if it works.


Let’s first try and make a “photocopy” to determine whether the issue is with the printer or not. Place a document on the scanner glass and choose “Copy” option. If the printer is making a good copy, then the printer hardware is fine.


If the copy comes out bad, then I would suggest here is to follow all the steps suggested in the support document for - HP ENVY 5540, DeskJet 5570 Printers - Fixing Poor Print Quality (This document includes the steps which are suggested for color or black not printing).


If the copy comes out fine, then it looks like an issue with the print drivers. Hence, I would suggest you perform a clean install to get the printer connected to your PC. Here are the steps:


First, unplug the USB cable from the printer if present.

Go to Control panel – Programs and feature – Select all the HP Envy printer entries and uninstall them.

Now go to Control panel – Devices and printer – Select all the printer entries and remove the device.

Press the "windows key" + "r" to get the "Run" window open - Type "printui.exe /s" (There is a space between .exe & /) and press enter.

Under print server properties, go to drivers - remove any entry there as well.

Again, go to the Run window, type – “c:/programdata” – Go to Hewlett Packard folder, remove any printer related folders & files.

Restart your computer.

Now click on this link :  http://ftp.hp.com/pub/softlib/software13/COL61235/mp-147821-1/EN5540_Full_WebPack_1119.exe to download and install the latest printer software.

Connect the USB cable if prompted and follow the onscreen instructions to complete the installation.

Restart the PC once done and then try to print.


Let me know if those steps worked for you.

If they did, that’s awesome!

Give us some reinforcement by clicking the solution and kudos buttons,

That’ll help us and others see that we’ve got the answers!

Good Luck.

Printing Off Of The Page

$
0
0

I'm trying to print on thick paper (Which are within the support paper types and something I have printed on dozens of times) but for some reason, it is printing the first portion of the image off of the paper.


I have set the paper type on the printer to Thick and have set the settings on the computer to Thick as well.

I have reset the printer as well as the PC (Also tried printing from my Mac)

I have tried printing with just one sheet, 5 sheets, and a stack of sheets in the paper tray

I have tried making sure that there are no obstructions and that all of the rollers are clean


I printed 10 pages the exact same way and they all printed just fine... then page 11 and all pages afterward are printing like this...


20180123_192550.jpg20180123_193210.jpg20180123_193218.jpg

Re: Unable to access printer control menu because it is locked.

$
0
0


HP C410 All in One with Fax being used wirelessly.

Printer locked up in quick forms after i changed internet provider.  Never got a chance to reprogramm ip information.  


Re: Printer is connected, but still won't print

$
0
0


Welcome to the HP Forums. I would be happy to help you with your HP Officejet Pro K8600 printer . I understand that it is showing printer offline when you try to print and you have already done some preliminary troubleshooting.


However, I will need a few details to provide an accurate solution,

  • When did this issue start?
  • Did you do any hardware or software changes?

Meanwhile

Perform a power reset

  1. Turn on the printer, if it is not already on.
  2. Wait until the printer is idle and silent before you continue.
  3. With the printer turned on, disconnect the power cord from the rear of the printer.
  4. Wait at least 30 seconds.
  5. Reconnect the power cord to the rear of the printer.
  6. Turn on the printer.

Make sure the correct port is selected

  1. Search Windows for devices, and then select Devices and Printers in the list of results.

    The Devices and Printers window opens.

  2. Right-click the name of your printer, and then select Printer Properties.

    The Properties window opens.

  3. Click the Ports tab, and then find the name of your printer in the Printers column.

    • If the printer uses a USB connection, make sure the port name or description includes USB or DOT4

    • If the printer uses a network connection, make sure the port name or description includes WSD, network, Standard TCP/IP Port, or HP Standard TCP/IP Port.

      Figure : Example of the WSD port selected for a wireless printer

      Example of the WSD port selected for a wireless printer
  4. Select the correct port type if the selection does not match the current connection used by the printer.

Update the printer firmware

HP regularly releases printer updates. Updating the printer firmware might resolve the issue. For more information, see Updating Firmware on the Printer.


Click here and refer the HP document for more assistance.


Let me know how it goes.

Cheers.

Re: printer not operating

$
0
0


Welcome to the HP Forums, this is a great location to get assistance! I read your post and see that you are getting ink system failure error on HP Photosmart Premium All-in-One Printer - C309g Printer. I would like to help you resolve this issue. 


However, I will need a few details to provide an accurate solution,

  • When did this issue start?
  • Did you do any hardware or software changes?
  • How is the printer connected to computer, wired or wireless?
  • Which operating system is installed on the computer?

Meanwhile:


Clean the ink cartridge vents and contacts

  1. Gather the following materials:

    • A pin to clean any clogged vents

    • A clean, lint-free cloth

    • A clean, dry cotton swab

    • Distilled or bottled water

         CAUTION:

      Do not use tap water because it might contain contaminants that can damage the printhead.

  2. Turn on the printer.

  3. Open the ink cartridge access door.

  4. To remove the ink cartridge, press the tab on the front of the ink cartridge to release it, and then remove it.

    Figure : Example of removing an ink cartridge from the printhead

    Example of removing an ink cartridge from the printhead
  5. Place the ink cartridges on a clean piece of paper with the ink opening pointing up.

       CAUTION:

    Do not leave the ink cartridges outside the printer longer than 30 minutes. Doing so can result in damage to both the printer and the ink cartridges.

  6. If an orange tab is attached to any ink cartridge, remove it.

    Figure : Example of the orange tab

    Example of the orange tab
  7. Examine the vent area located on top of the ink cartridge, next to the HP logo.

    Figure : Example of the vent area

    Example of the vent area
  8. If any of the ink cartridges have clogged vents, use a pin to clean the vents.

    Figure : Example of a clogged vent

    Example of a clogged vent

    Figure : Example of a clean vent

    Example of a clean vent
  9. Use a fresh, lightly dampened, lint-free cloth to wipe any accumulated ink and debris on the copper-colored contact on the ink cartridge.

    Figure : Example of the copper-colored contact on the ink cartridge

    Example of the copper-colored contact on the ink cartridge
  10. Carefully reinsert one of the ink cartridges into its slot, and then push the ink cartridge down and forward until it snaps into place.

    Make sure each colored dot on the ink cartridge label matches the colored dot on the carriage.

    Figure : Reinserting the ink cartridge into the correct slot

    Example of sliding the ink cartridge into the correct slot

    Figure : Example of snapping the ink cartridge into place

     Example of snapping the ink cartridge into place
  11. Run your finger along the top of the ink cartridges to make sure none of them protrude.

    If any ink cartridges protrude, press down firmly until each ink cartridge snaps into place.

  12. Close the ink cartridge access door.

  13. Check the printer control panel display for the error message.

Clean the printhead with an automated tool


Manually clean the printhead


  1. Gather the following materials:

    • A clean, lint-free cloth

    • A clean, dry cotton swab

    • Distilled or bottled water

         CAUTION:

      Do not use tap water because it might contain contaminants that can damage the printhead.

  2. Open the ink cartridge access door.

  3. To remove the ink cartridge, press the tab on the front of the ink cartridge to release it, and then remove it.

    Figure : Example of removing an ink cartridge from the printhead

    Example of removing an ink cartridge from the printhead
  4. Place the ink cartridges on a clean piece of paper with the ink opening pointing up.

       CAUTION:

    Do not leave the ink cartridges outside the printer longer than 30 minutes. Doing so can result in damage to both the printer and the ink cartridges.

  5. Lift the latch handle on the ink carriage until it stops.

    Figure : Lifting the ink carriage latch handle

    Lifting the ink carriage latch handle
  6. Lift up to remove the printhead from the ink carriage.

    Figure : Removing the printhead

    Removing the printhead
  7. Review the three areas of the printhead that need to be cleaned.

    Figure : Example of the three areas to clean on the printhead

    1. Plastic ramp on the side of the ink nozzles

    2. Edge between nozzles and contacts

    3. Electrical contacts

       CAUTION:

    Do not touch the nozzles or the electrical contacts with your fingers. Touch the electrical contact areas only with the cleaning materials.

  8. Use a fresh, lightly dampened, lint-free cloth to wipe the electrical contact area from the bottom to the top until no new ink shows on the cloth.

    Use as many fresh, lightly dampened, lint-free cloths as necessary.

    Figure : Cleaning the electrical contacts

    Cleaning the electrical contacts
  9. Use a fresh, lightly dampened, lint-free cloth to wipe any accumulated ink and debris from the edge between the nozzles and the contacts.

    Figure : Cleaning the edge of the printhead

    Cleaning the edge of the printhead
  10. Use a fresh, lightly dampened, lint-free cloth to wipe the plastic ramps on both sides, away from the nozzles.

    Figure : Cleaning the printhead ramps

    Cleaning the printhead ramps
  11. Wipe the previously cleaned areas dry with a dry, lint-free cloth.

  12. Use a fresh, lightly dampened, lint-free cloth to wipe the electrical contact area inside the printer from bottom to the top until no new ink shows on the cloth.

    Use as many fresh, lightly dampened, lint-free cloths as necessary.

    Figure : Cleaning the electrical contacts inside the printer

    Cleaning the electral contacts inside the printer
  13. Wipe the electrical contact area dry with a dry, lint-free cloth.

  14. Make sure the ink carriage latch handle is up, then reinstall the printhead.

    Figure : Reinstalling the printhead

     Reinstalling the printhead
  15. Carefully lower the ink carriage latch handle.

    Figure : Lowering the ink carriage latch handle

    Lowering the ink carriage latch handle
  16. Reinsert the ink cartridge into the matching letter and colored dot slot, then push the ink cartridge down and forward until it snaps into place.

    Figure : Example of sliding the ink cartridge into the correct slot

    Example of sliding the ink cartridge into the correct slot

    Figure : Example of snapping the ink cartridge into place

     Example of snapping the ink cartridge into place
  17. Run your finger along the top of the ink cartridges to make sure none of them protrude.

    If any ink cartridges protrude, then press down firmly until each ink cartridge snaps into place.

  18. Close the ink cartridge access door.

  19. Check the printer control panel display for the error message.

Click here and refer the HP document to perform the above steps.


Let me know how it goes.

Cheers.

Re: After installing a new color ink cartridge on hp 4630 I get an error message

$
0
0


Hi ,


Thank you for replying,

As I understand you have tried to use the old cartridges, which seems to be working on this printer, this definitely looks like an issue with the cartridges itself. I would suggest you try to replace the ink cartridges from the store you have purchased or contact our HP phone support.


HP Technical Support can be reached by clicking on the following link: http://h22207.www2.hp.com/us-en/?openCLC=true

(1) Once the support page opens please select the country in which you're located. Next, enter your HP model number on the right.

(2) Next, choose the 'Contact Support' tab at the top and scroll down to the bottom of the 'HP Support- Contact' page to fill out the form provided with your contact information.

(3) Once completed click the 'Show Options' icon on the bottom right.

(4) Lastly, scroll down to the bottom of the page and select 'Get the phone number.' A case number and phone number will now populate for you.


If you have any troubles, let me know and I will do my best to help!


Hope this helps, for any further queries reply to the post and feel free to join us again

Feel free to post your query for any other assistance as well,

It's been a pleasure interacting with you and I hope you have a good day ahead.


If you wish to show appreciation for my efforts, mark my post as Accepted Solution.

And click on the Purple Thumbs up icon at the bottom of my comment.


Regards,


Re: HP OfficeJet 6600 Alignment

$
0
0


Welcome to the HP Forums, this is a great location to get assistance! I read your post and see that you are getting paper jam issue on HP Officejet 6600 Printer. I would like to help you resolve this issue. 


However, I will need a few details to provide an accurate solution,

  • When did this issue start?
  • Did you do any hardware or software changes?
  • How is the printer connected to computer, wired or wireless?
  • Which operating system is installed on the computer?

Meanwhile:

Turn the printer off and then on again

  1. Press the Power button to turn off the printer. If the printer does not turn off, continue to the next solution.

  2. Wait 60 seconds.

Printer Status Report

  1. Load Letter or A4, unused, plain white paper into the input tray.

       NOTE:

    Do not load specialty paper in Tray 2. Tray 2 only supports plain letter and A4 paper.

    For more information on loading paper, see Loading Plain Paper, Cards, Photo Paper, and Envelopes. Loading paper correctly might prevent paper jams.

    If you are experiencing problems with certain paper types or sizes, see the Product Specifications to make sure that your printer supports other sizes and types of paper.

  2. On the printer control panel, touch the Right Arrow () to display the second navigation screen.

  3. Touch the Setup icon ().

  4. Touch the Down Arrow (), and then touch Reports.

  5. Touch Printer Status Report. The self-test report prints.

Clear the paper jam from the paper trays

Step one: Clear the paper jam from the output tray

  1. Carefully remove any loose paper from the output tray.

  2. Check the rollers in the output tray for jammed paper.

  3. Use a flashlight to see the rollers in the printer.

    Figure : Use a flashlight

    Image: Use a flashlight
  4. Gently remove any jammed paper or bits of torn paper from the output tray rollers. Use both hands to pull out any whole sheets of paper to avoid tearing them.

  5. Remove any bits of paper or torn pieces of paper from the output tray rollers.

Step two: Clear the jam from the input tray

  1. Press the Power button to turn off the printer.

  2. Disconnect the power cord from the rear of the printer.

  3. Remove all paper from the output tray.

  4. Raise the output tray.

    Figure : Raise the output tray

    Image: Raise the output tray.
  5. Grasp any jammed paper in the input tray with both hands, and then pull the paper slowly but firmly toward you to remove it.

       CAUTION:

    Remove paper from the tray as carefully as possible. If any torn pieces of paper remain inside the printer, more paper jams are likely to occur, and this could damage the print mechanism.

  6. Lower the output tray.

  7. Reconnect the power cord to the rear of the printer.

  8. Press the Power button to turn off the printer.

Clean the rollers

Clear the paper jam from the automatic document feeder

Reset the printer

  1. Press the Power button () to turn on the product.

  2. With the product turned on, disconnect the power cord from the rear of the product.

  3. Unplug the power cord from the wall outlet.

  4. Wait at least 15 seconds.

  5. Plug the power cord back into the wall outlet.

  6. Reconnect the power cord to the rear of the product.

  7. If the product does not turn on by itself, press the Power button () to turn it on.

Click here and refer the HP document to perform the above steps.


Let me know how it goes.

Cheers.

Re: HP2652 cuts off bottom

$
0
0
None of this addresses or fixes this issue

Can't get yellow cartridge to print - lots of diagnosis done Help

$
0
0

My 7510 is a brilliant printer when it works it usually plays up when changing the genuine cartridges. This time it has excelled itself - I threw out a batch of troublesome ones and installed all new. Initially blue and yellow showed as a dot on the screen indicating an issue. I fiddled with both and the blue started working. The yellow stubbornly wont print. I have changed it 3 times now for new and made sure ink actually comes out the bottom of the cartridge onto a tissue. there isnt any blockage on any of the yellow cartridges ive tried!

The ink level feature on screen shows Yellow as full but the diagnostic print out shows no ink. Weird! Ive cleaned and aligned via the toolbox several times now without success.

I have removed the printhead 3 times and cleaned everything as per online instructions - reinstalled and problem persists.

I have even gently abraded the 3 pins the printer chip connects to on the printhead carraige - no change.

I have followed the help guide to completely remove the printer driver software and successfully reinstalled via this site.

i'm now at a complete loss - I'm not sure replacing the printhead itself will resolve this as the printer believes there is no Yellow ink and I'm guessing the printer takes its cue via the 3 little connectors in front of the printhead which is a part of the printer itself.

PLEASE HELP ME - IVE SPENT QUITE LITERALLY SEVERAL HOURS AND MORE TIME THAN THE PRINTER IS WORTH ON THIS FAULT.

Brand new Black 564XL ink won't print

$
0
0

I recently purchased a new HP 564 XL Black ink cartridge for my HP Deskjet 3520.  I cannot get it to print using the black ink. I have done all the troubleshooting that I could find on the topic and no success. ANyone have any ideas? It is not like I could afford the ink cartridge in the first place and now I am not excited about possibly waisting 30 dollars. Please Help! THank you

Trying to setup a new HP Envy Photo 7855 confused about security issues

$
0
0

I am trying to set up a new HP Envy Photo 7855 printer.  When I go to download software from HP, I get this popup message: "Information regarding recent vulnerabilities

 HP is aware of the recent class of vulnerabilities..." It has a link to click on so I did that. However, aside from downloading all of the windows updates, the rest of what I need to do I am unsure of. Also, one of the windows updates failed: 


2018-01 Security Monthly Quality Rollup for Windows 7 for x64-based Systems (KB4056894)

Installation date: ‎1/‎20/‎2018 10:47 PM

Installation status: Failed

Error details: Code 80242016

Update type: Important

A security issue has been identified in a Microsoft software product that could affect your system. You can help protect your system by installing this update from Microsoft. For a complete listing of the issues that are included in this update, see the associated Microsoft Knowledge Base article. After you install this update, you may have to restart your system.


I will also add that I wanted to set up a direct connection from my laptop to the printer and by pass the wireless altogether. However, the setup automatically connected wirelessly. I could print out a test page but on my list of Wireless  Network Connections it had the printer listed as public and vulnerable. I really quick shut down the printer and uninstalled all the software except for the HP photo creations.


My questions are: Can I set up this printer to connect directly to my laptop? If so, how? Or, if I set this up wirelessly (the best option), how can I do this securely? 


Thank you for your help in advance. 

Re: Not printing black ink

$
0
0

I bought a brand new ink cartridge and it still wont print black. 

Re: left margin cut off when copying from printer

$
0
0
I believe the printer was making accurate copies a few weeks ago and as far as I know there have been no software updates. I've followed the steps in the linked article and still have a copy that has shifted the whole original about a half inch to the right.

Hp Envy 7640 used to print find on card stock with no special pref, but now the paper keeps jamming?

$
0
0
I just don’t understand. I printed out stuff for my daughters bday party this same time last year on card stock, and now I’ve tried two different types of card stock and it won’t work. I didn’t have to use any special preferences for paper type last year, so what gives??
And if y’all are just going to tell me to change the paper type then don’t bother. Because it worked fine for a LOT of printing last year.

Re: Error Code 0:0x6203d0b1

$
0
0

This issue (the error code) showed up after I tried all the things you have mentioned to do - clean the printhead, the electrical outlets in the printer, resetting the printer  - everything HP support said to do.  


Initially, my printer was fine until it ran out of black ink.  So, I ordered remanufactured ink cartridges from a business I have ordered them from 3 times.  They have all worked before.  I replaced all of the cartridges and then my printer would not print black ink.  I read all about this problem on your online support.  No help.  Then I started getting alignment failure messages and incompatible printhead messages.  I removed all of the new cartridges and installed all new ones.  No help. Still wouldn't print black ink, and then the error code 0:0x6203d0b1 appeared. BTW, WHAT DOES THIS ERROR CODE MEAN?


So, after trying everying possible, I went and bought all new genuine HP cartridges.  It made no difference.  


Somewhere during this 3-day process, I was promted to download the current HP software to my computer.  It made no difference. I also shut and restared my laptop during this whole process.  My printer is wireless and when I request a document to be printed from my laptop, it prints it, but just a blank sheet of paper comes out whether I request a color or black only copy.


In additon, if I try to make a copy of a document by putting it on the printer tray, it will not print out black when black is requested.  I just get a black sheet. If I select, color, it will make a copy.  

Re: New HPEnvy7640 Printer consistently showing offline on New HPEnvyx360 when connected & both

$
0
0

Hi Jeet,

I have followed all of the steps you outlined, unfortunately I am unable to remove the drivers and have not been able to move on from that step. I keep getting an error stating that the printer is in use. The printer isnot in use, the files have all been deleted, there are no projects left unprinted, the printer itself has been removed, and the task manager does not show any HP Envy printer processes going on. How do I continue?


 Printer Trouble Shoot Error Removing Driver Package Error.JPGPrinter Trouble Shoot Error Removing Driver.JPG

Re: "Attention Required" but there is nothing wrong

$
0
0

I am having the same problem.  I find the solution wholly insufficient.  This is a software problem - somehow, the printer is not communicating with the computer that whatever problem has been fixed.  Therefore, HP needs to address this as a software bug.  These cumbersome steps will not prevent the problem from happening again.

cannot connect to HP Rewards

$
0
0

I have two HP printers.  Every time I insert a new HP print cartridge, the pop up windows encfourages me to click for HP Rewards. Every time i then get the message "cannot connect to HP rewards".

What's the problem?

Viewing all 313454 articles
Browse latest View live


Latest Images

<script src="https://jsc.adskeeper.com/r/s/rssing.com.1596347.js" async> </script>